Hey everyone, I hope you’re having an incredible day today. Today, I will show you a way to prepare a distinctive dish, our homemade authentic kimchi. One of my favorites. For mine, I am going to make it a bit tasty. This will be really delicious.
Our Homemade Authentic Kimchi is one of the most favored of recent trending meals on earth. It is simple, it is fast, it tastes delicious. It’s enjoyed by millions every day. They’re fine and they look fantastic. Our Homemade Authentic Kimchi is something that I have loved my entire life.
Craving for kimchi at hindi makalabas dahil sa lockdown? Watch our home made authentic kimchi tutorial para makagawa ka rin ma. Sohi kimchi caters to the Korean palette with authentic flavors honed over generations.
To begin with this particular recipe, we have to prepare a few components. You can cook our homemade authentic kimchi using 17 ingredients and 11 steps. Here is how you can achieve that.
The ingredients needed to make Our Homemade Authentic Kimchi:
- Take 3 whole Chinese cabbage
- Take 1/3 A) Daikon
- Get 2 whole A) Carrots
- Get 1 1/2 bunches A) Chinese chives
- Make ready 200 grams B) Red chili peppers (coarsely ground)
- Get 100 grams B) Red chili peppers (finely ground)
- Take 2 C) Apples
- Make ready 170 grams C) Garlic
- Make ready 1 piece C) Ginger
- Take 100 ml C) Honey
- Take 80 grams C) Sugar
- Get 1 packages C) Cut kombu
- Make ready 3 tbsp C) White sesame seeds
- Get 2 packages Dashi stock granules
- Get 400 grams Salt
- Make ready 1 3/8 liter Water
- Prepare 400 grams Salt-fermented shrimp paste
Kimchi or kim chee is one of the most popular Korean foods. This quick and easy recipe results in authentic, raw, probiotic Kim Chee. Homemade kimchee is perfect for vegetarians, vegans, raw foodists, or just people who'd like to get some digestive probiotics into their diet from cultured foods. Our first batch of homemade kimchi!
Steps to make Our Homemade Authentic Kimchi:
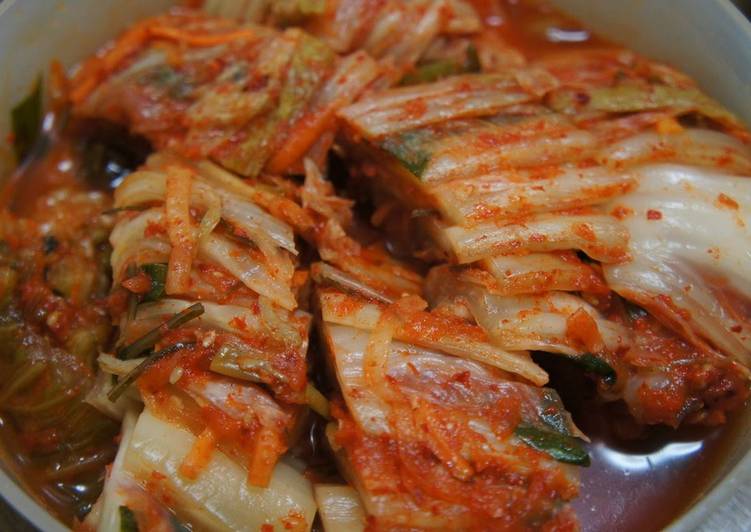
- A freshly picked cabbage is hard to cut through, so let it rest in a dark place for about half a day. Once wilted a little, cut into 6 to 8 pieces.
- Sprinkle salt on the cabbage cores and start filling the barrel with them. Once filled, cover with about 1.5 times the weight of the 10 kg of cabbage.
- During the winter, all the liquid should come out within a day.
- Take out the cabbage and rinse well with water.
- Squeeze out the liquid piece by piece and let sit for a while. Then, squeeze out the liquid once more from the core to the leaves.
- Finely julienne the daikon and carrots marked with A). Cut the A) chives into 3 cm pieces.
- Bring 1.4 liter of water to a boil and add the dashi granules. Once cooled, add in the C) ingredients, apples, garlic, grated ginger. Add in the B) ingredients and shrimp paste.
- Mix well and let sit for about 30 minutes. Add in the A) ingredients and mix together. Now you have the yangnyeom sauce.
- Take the cabbage pieces from Step 5 and smear the yangnyeom sauce between each leaf.
- Arrange the cabbage pieces in a container.
- To seal off air, cover with plastic wrap and store in the refrigerator. It will be ready to eat in 3 days at the earliest, depending on your preference.
We specialise in manufacturing authentic Kimchi using local ingredients. Why not try our fresh and delicious kimchi made in the UK ! Our easy homemade keto kimchi is delicious, nutritious & quick to prepare. Enjoy this as a low carb & paleo dinner side. · Sharing an authentic and traditional Korean napa cabbage kimchi recipe. This is the most basic and common form of kimchi that is a side for many dishes. (Video) Homemade Kimchi.
So that is going to wrap this up for this special food our homemade authentic kimchi recipe. Thanks so much for reading. I’m confident that you will make this at home. There’s gonna be interesting food at home recipes coming up. Remember to save this page in your browser, and share it to your loved ones, colleague and friends. Thanks again for reading. Go on get cooking!